MongoDB Master Guide
MongoDB Compass — Master Guide
By Aditya Maruti Kapse | TYBCA D | Sri Balaji University, Pune
🔍 Introduction to MongoDB Compass
Welcome to the comprehensive guide on MongoDB Compass, the official Graphical User Interface (GUI) tool developed by MongoDB Inc. for interacting with your MongoDB databases. In today's data-driven world, efficiently managing and visualizing database content is paramount for developers, data analysts, and database administrators alike.
While the MongoDB Shell provides powerful command-line capabilities, Compass offers an intuitive and visual approach, simplifying complex tasks and making database interaction accessible to users of all skill levels. From exploring your data to building complex aggregation pipelines and monitoring performance, Compass streamlines your workflow and enhances productivity.
This guide will walk you through everything you need to know about MongoDB Compass, from its installation and basic usage to advanced features like schema analysis and performance tuning. Whether you are a beginner looking to get started or an experienced user seeking to optimize your workflow, this master guide has got you covered.
Why Choose MongoDB Compass?
- Visual Exploration: Navigate through databases and collections with ease, view documents, and understand your data structure at a glance.
- Query Building: Construct intricate queries using a visual query builder, eliminating the need to memorize complex syntax.
- Performance Monitoring: Gain real-time insights into database operations, identify slow queries, and optimize performance.
- Schema Analysis: Understand your evolving schema with visual representations of field types, distribution, and potential anomalies.
- Aggregation Pipeline Editor: Build and test powerful data aggregation pipelines step-by-step, seeing the results of each stage visually.

Fig 1.1: An overview of the MongoDB Compass dashboard, showing database and collection navigation.
Ready to dive in? Let's begin your journey to mastering MongoDB Compass!
🌟 Key Features of MongoDB Compass
MongoDB Compass is packed with features designed to make working with MongoDB databases intuitive and efficient. Here's a deeper look into its core capabilities:
1. Schema Visualization
One of Compass's standout features is its ability to analyze and visualize your collection's schema. MongoDB's flexible schema can sometimes make it challenging to understand your data's structure, especially in large or evolving datasets. Compass provides a clear overview of field types, data distribution, and even identifies missing or extra fields, helping you maintain data consistency and optimize your schema design.
- Field Types: See the data type for each field (e.g., String, Number, Date, Object, Array).
- Distribution: Understand the frequency and percentage of each field type.
- Missing/Present Fields: Quickly identify which documents lack certain fields or have unexpected ones.
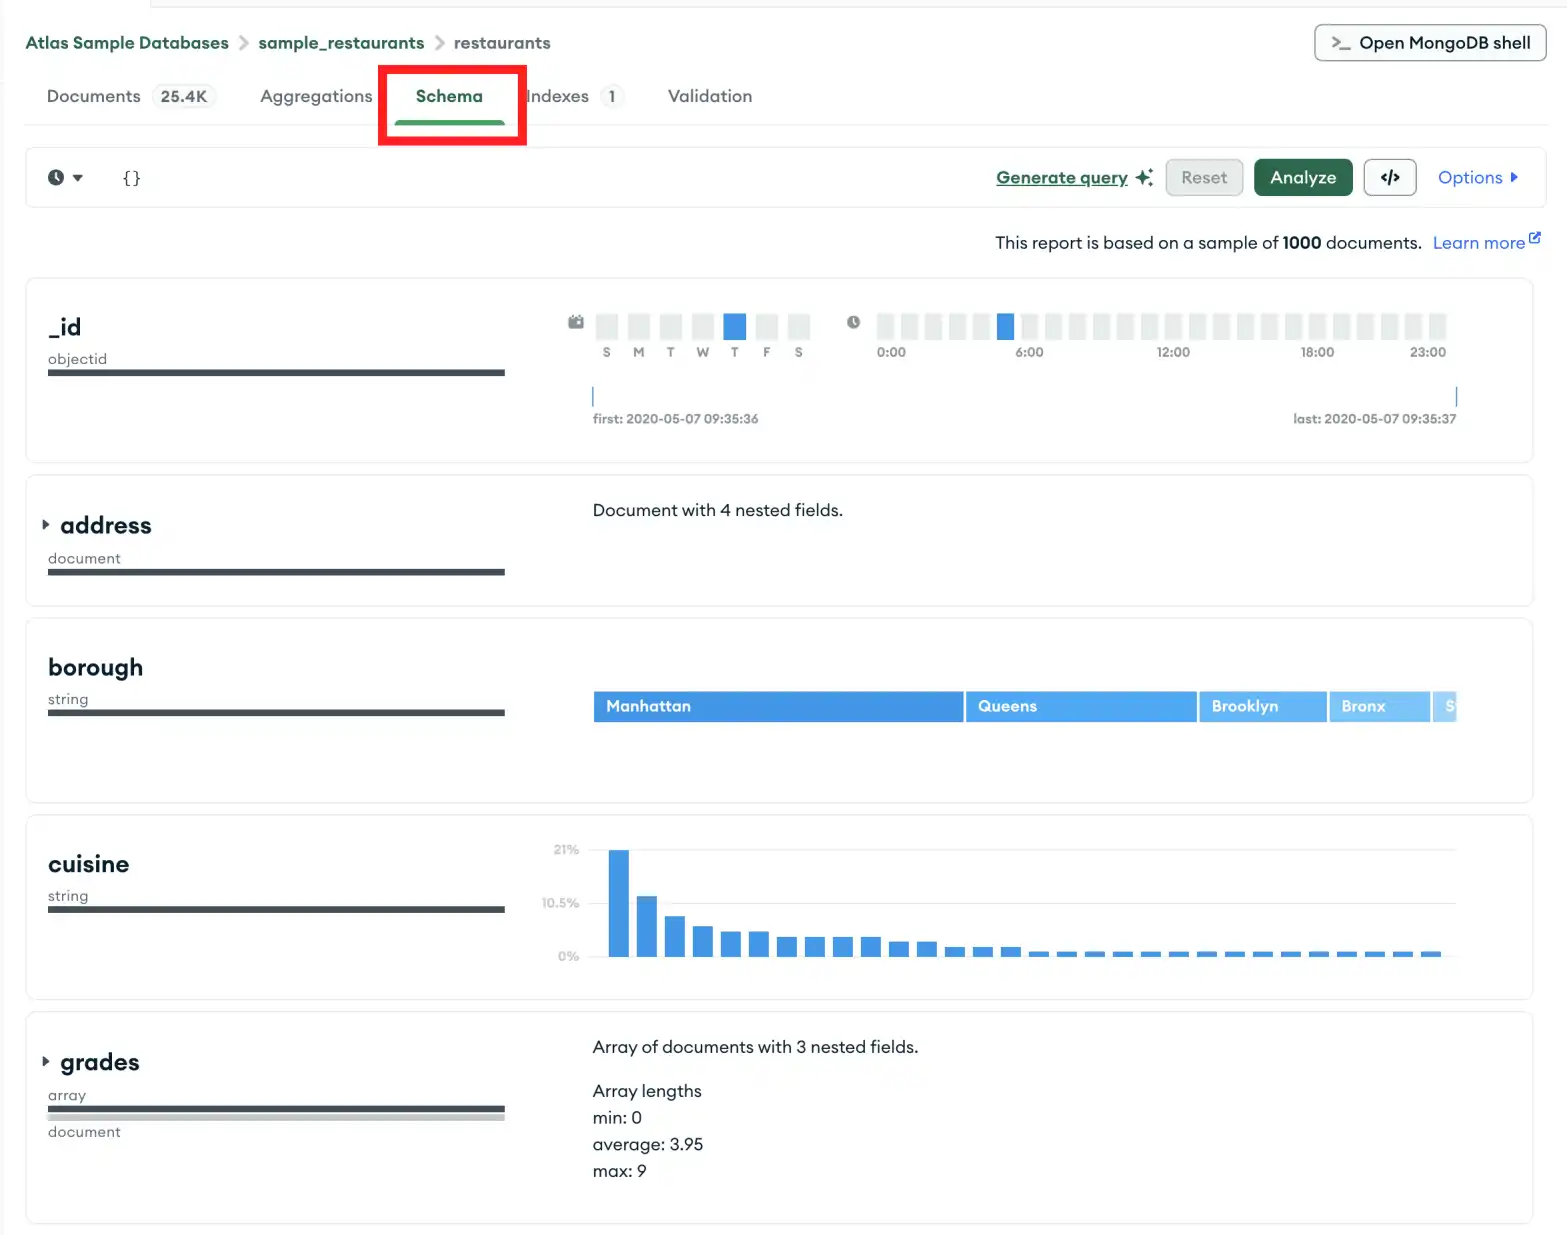
Fig 2.1: The Schema tab in Compass, showing field types, distribution, and data insights.
2. Visual Query Builder
Forget memorizing complex JSON query syntax. Compass's Query Builder allows you to construct powerful queries using a user-friendly interface. You can easily add filters, define projections (which fields to return), sort results, and apply limits or skips, all with point-and-click actions.
Fig 2.2: Building a query using the visual Query Builder in MongoDB Compass.
3. Aggregation Pipeline Editor
Aggregations are crucial for data processing and analysis in MongoDB. Compass provides an interactive Aggregation Pipeline Editor that allows you to build, test, and visualize each stage of your pipeline. You can add stages like $match, $group, $project, and see the output of each stage in real-time, making debugging and optimization much simpler.
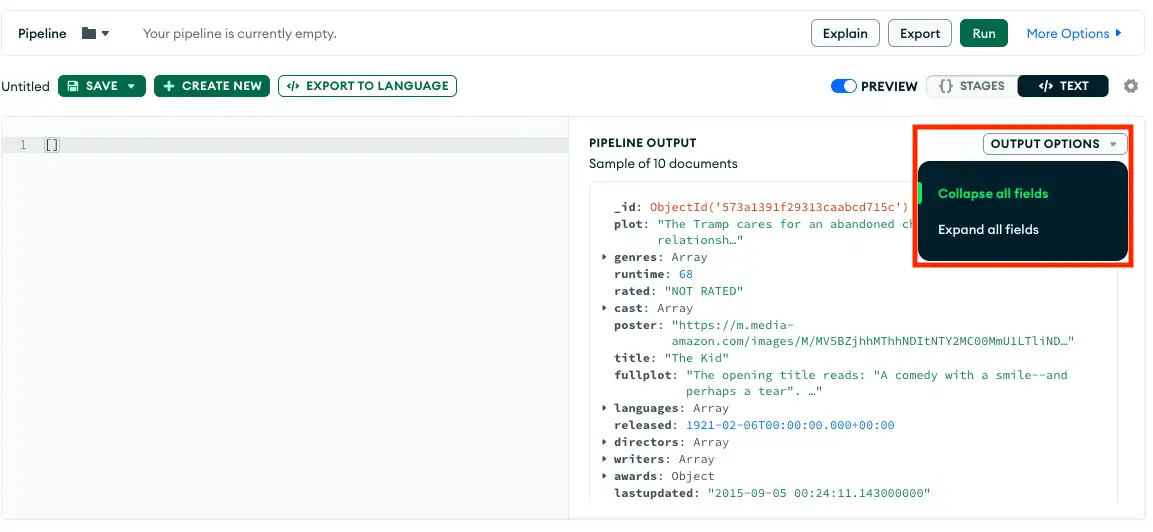
Fig 2.3: The Aggregation Pipeline Editor, showing stages and their output.
4. Performance Monitoring and Explain Plan
Identify and resolve performance bottlenecks with Compass's monitoring tools. You can view real-time server statistics, track operations per second, and analyze slow queries. The built-in explain() feature visually breaks down how MongoDB executes your queries, helping you understand index usage and optimize query performance.

Fig 2.4: Real-time performance metrics and explain plan visualization in Compass.
5. Index Management
Indexes are vital for query performance. Compass provides a dedicated interface to view, create, and drop indexes on your collections. You can define single-field, compound, text, or geospatial indexes with ease, and understand their impact on your queries.
Fig 2.5: Managing indexes through the Compass interface.
6. Geospatial Data Support
For applications dealing with location-based data, Compass offers features to visualize and query geospatial data directly on a map, making it easier to work with points, lines, and polygons.
These features, among others, make MongoDB Compass an indispensable tool for anyone working with MongoDB.
⚙️ Installing MongoDB Compass Step-by-Step
Installing MongoDB Compass is a straightforward process. This section provides a detailed, step-by-step guide to help you get Compass up and running on your system, complete with screenshots to ensure a smooth experience.
1. Visit the Official Download Page
Open your web browser and navigate to the official MongoDB Compass download page. This is the most reliable source to ensure you're getting the latest and most secure version.
MongoDB Compass Download Page
Fig 3.1: The official MongoDB Compass download page. Ensure you select your correct operating system.
2. Select Your Operating System and Download
On the download page, you will see options for different operating systems (Windows, macOS, Linux). Select your specific OS, and then click the 'Download' button. The download will begin automatically.
- For Windows: Typically downloads an `.exe` file.
- For macOS: Usually downloads a `.dmg` file.
- For Linux: Options include `.deb`, `.rpm`, or `tar.gz` files depending on your distribution.

Fig 3.2: After selecting your OS, click the 'Download' button to start the installer download. (Image is a general download page screenshot.)
3. Run the Installer
Once the download is complete, locate the installer file in your downloads folder (or wherever your browser saves files) and double-click it to start the installation process.
Fig 3.3: Double-click the downloaded installer file to begin the setup wizard.
4. Navigate Through the Setup Wizard (Windows Example)
The installation wizard will guide you through the setup. The steps might vary slightly based on your operating system, but the general flow remains consistent.
4.1. Welcome Screen
The first screen will typically welcome you to the MongoDB Compass Setup Wizard.

Fig 3.4: The initial welcome screen of the MongoDB Compass Setup Wizard.
4.2. License Agreement
Read the license agreement carefully and accept it to proceed with the installation.
Fig 3.5: Accept the license agreement to continue the installation.
4.3. Choose Setup Type
You'll usually have options like "Complete" or "Custom." For most users, "Complete" is recommended as it installs all necessary components.
Fig 3.6: Select "Complete" for a standard installation with all features.
4.4. Installation Progress
The installer will now copy the necessary files to your system. This might take a few moments.
Fig 3.7: The installation progress bar indicates the current status of the setup.
4.5. Installation Complete
Once the installation is finished, you will see a confirmation screen. Click 'Finish' or 'Launch MongoDB Compass' to complete the setup and open the application.
Fig 3.8: The final screen confirming successful installation. You can launch Compass directly from here. (Note: This specific screenshot is from macOS installation.)
5. Launching MongoDB Compass and Connecting
After installation, you can launch MongoDB Compass from your desktop shortcut, Start Menu (Windows), Applications folder (macOS), or command line (Linux).
5.1. Initial Connection Screen
Upon the first launch, Compass will present you with a connection screen. By default, it attempts to connect to a local MongoDB instance running on mongodb://localhost:27017.

Fig 3.9: The initial connection screen in MongoDB Compass, pre-filled with localhost details.
5.2. Connecting to Local MongoDB Instance
If you have a MongoDB server running locally, simply click the 'Connect' button. Compass will establish a connection, and you'll be greeted by your databases.

Fig 3.10: Successfully connected to a local MongoDB instance, showing available databases.
5.3. Connecting to a Remote or MongoDB Atlas Instance
For remote MongoDB instances or a cluster hosted on MongoDB Atlas, you'll need to provide a connection string. Click 'New Connection' and paste your connection string into the URI field, or fill out the individual connection fields.
Fig 3.11: Using a connection string for remote or MongoDB Atlas connections.
Troubleshooting Connection Issues
- MongoDB Server Not Running: Ensure your MongoDB server (
mongod) is running before attempting to connect with Compass. - Firewall Issues: Check if your firewall is blocking the connection to port 27017 (or your custom port).
- Incorrect Credentials: If using authentication, double-check your username and password.
- Incorrect Connection String: Verify the connection string for typos or missing parameters.
Congratulations! You have successfully installed MongoDB Compass and connected to your MongoDB instance. You are now ready to explore and manage your data visually.
🧪 How to Use MongoDB Compass Effectively
Once you've connected MongoDB Compass to your database, you can begin to explore and interact with your data. This section covers the fundamental steps for navigating and querying your MongoDB collections.
1. Navigating Databases and Collections
Upon successful connection, Compass displays a list of your databases on the left-hand panel. Clicking on a database will reveal its collections. Each collection will show a summary of its documents, size, and indexes.
Fig 4.1: Navigating through databases and collections in the Compass sidebar.
2. Exploring Documents
Clicking on a collection name will open its "Documents" tab. Here, you can view the documents within that collection. Compass presents documents in a readable JSON format, and you can switch between List View, Table View, or JSON View for your preference.
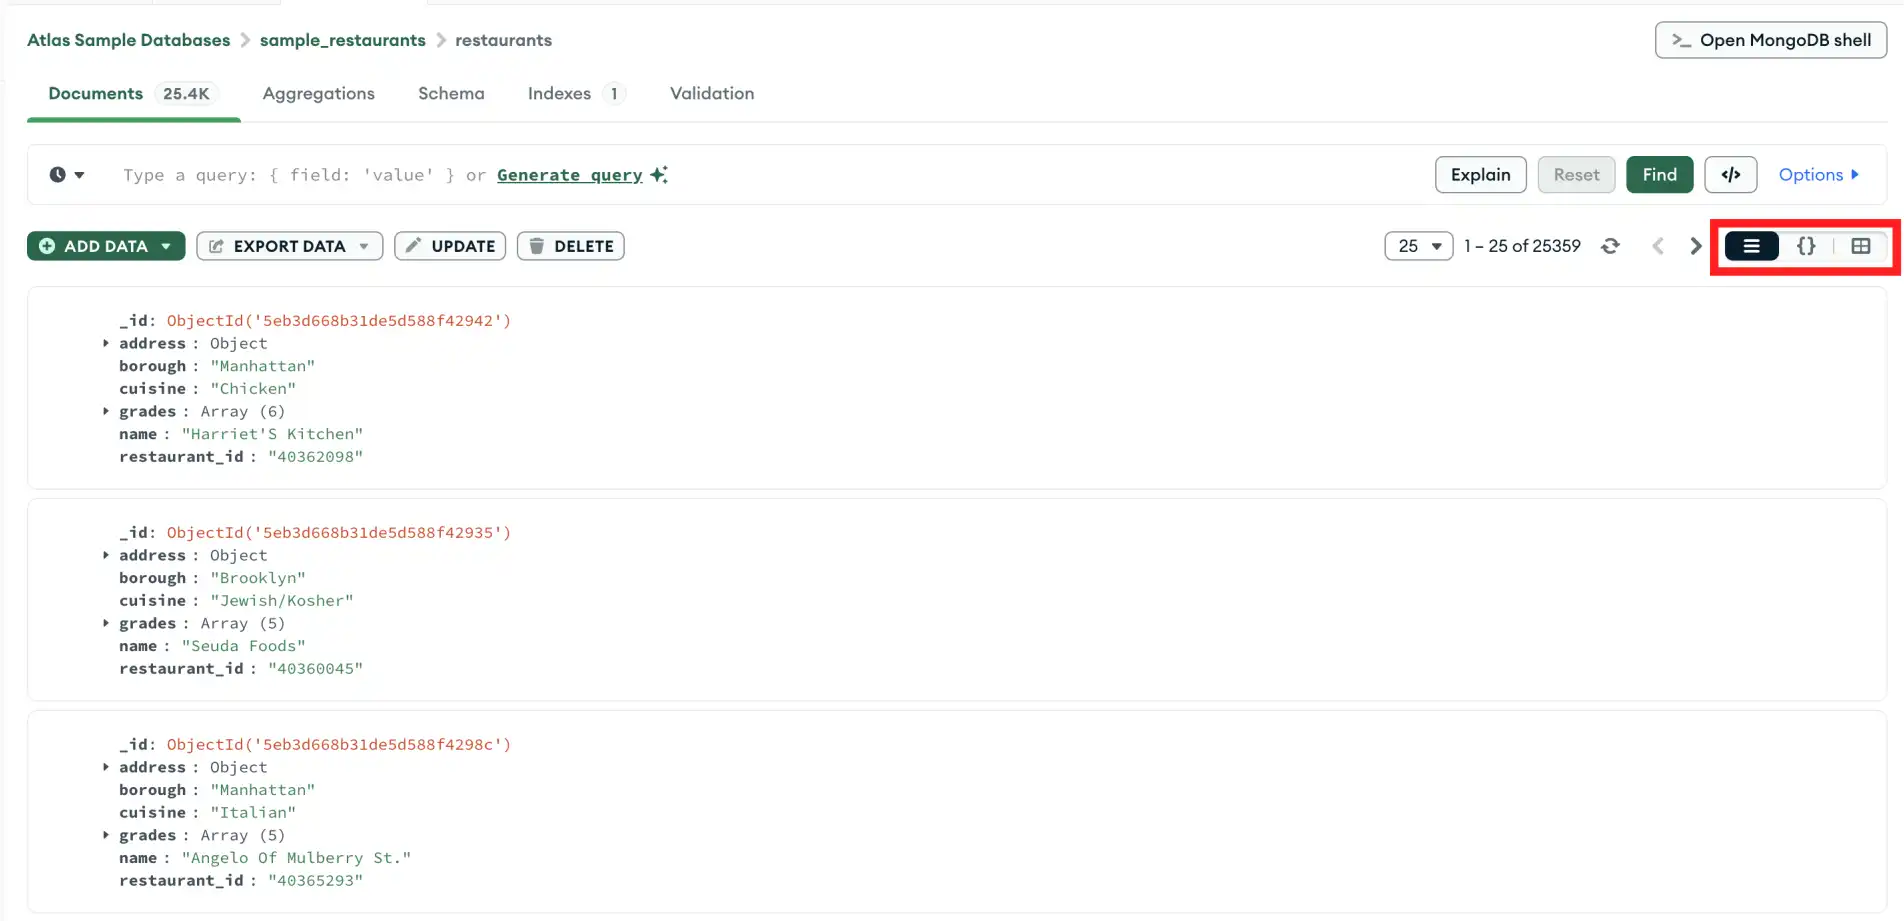
Fig 4.2: Viewing documents in a collection, with options for different display formats. (This is a generic document view.)
3. Using the Query Bar (Filter, Project, Sort)
The query bar at the top of the "Documents" tab is your primary tool for filtering, projecting, and sorting data. It allows you to construct powerful queries without writing raw JSON, though you can also directly input JSON if preferred.
- Filter: Enter a query document (e.g.,
{ "status": "active" }) to retrieve specific documents. - Project: Specify which fields to include or exclude from the results (e.g.,
{ "name": 1, "email": 1, "_id": 0 }). - Sort: Define the order of your results (e.g.,
{ "timestamp": -1 }for descending order). - Limit: Restrict the number of documents returned.
- Skip: Skip a certain number of documents, useful for pagination.

Fig 4.3: An example of using the query bar to filter, project, and sort documents.
4. Analyzing Schema and Visualizing Data
The "Schema" tab provides a visual breakdown of your collection's schema, showing field types, data distribution, and common values. This is invaluable for understanding your data and identifying inconsistencies. The "Aggregations" tab, as mentioned earlier, allows for visual construction of complex data transformations.

Fig 4.4: Visual schema analysis, including charts for data distribution.
5. Managing Indexes
The "Indexes" tab allows you to see all existing indexes on a collection, their sizes, and usage statistics. You can also create new indexes or drop old ones directly from this interface, which is crucial for optimizing query performance.

Fig 4.5: The Indexes tab, showing existing indexes and options to create new ones.
By mastering these basic usage patterns, you'll be well on your way to efficiently managing your MongoDB data with Compass.
🛠 Performing CRUD Operations in MongoDB Compass
MongoDB Compass simplifies the fundamental Create, Read, Update, and Delete (CRUD) operations, making it easy to manage your documents without writing complex shell commands. This section details how to perform each of these operations visually.
1. Create (Insert Documents)
Adding new documents to a collection is straightforward. Navigate to your desired collection, then use the "Add Data" button.
- Go to the "Documents" tab of your collection.
- Click the
Add Databutton. - Select
Insert Document. - A JSON editor will appear. Enter your document in JSON format. Compass provides basic validation and auto-completion.
- Click
Insertto save the document.
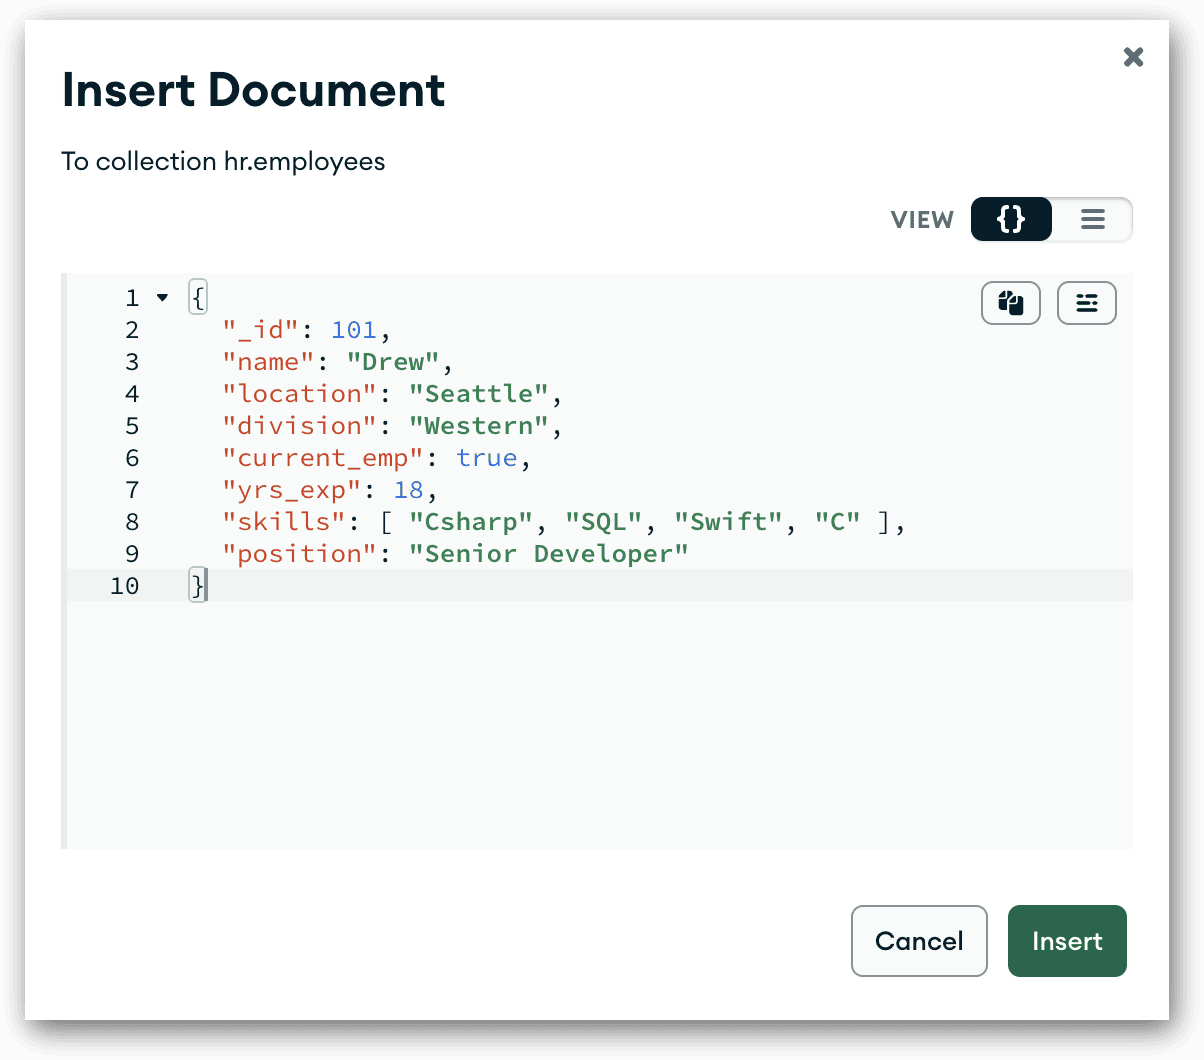
Fig 5.1: Inserting a new document into a collection using the JSON editor.
2. Read (Retrieve Documents)
Reading documents involves using the query bar to filter, project, and sort your data, as detailed in the "How to Use" section. Compass immediately displays the results based on your criteria.
- Navigate to the "Documents" tab of your collection.
- Use the
Filterinput field to specify your query criteria. - Optionally, use the
ProjectandSortfields to refine your results. - Click
Findto execute the query.

Fig 5.2: Retrieving documents using a filter (e.g., score > 80) in the query bar.
2.1. Advanced Query Examples
MongoDB Compass allows you to build complex queries using various operators. Here are a few examples of common query patterns and their results, which Compass helps you construct visually:

Fig 5.2.1: Querying for documents where 'score' is between 70 and 85 (inclusive), using {$gte: 70, $lte: 85}.

Fig 5.2.2: Using the $and operator to find documents where 'gender' is 'Female' AND 'department' is 'CS'.

Fig 5.2.3: Finding documents where 'department' is either 'IT' or 'ME', demonstrated with the $in operator.

Fig 5.2.4: Querying for documents where 'score' is less than or equal to 70, using {$lte: 70}.

Fig 5.2.5: Finding documents where 'age' is exactly 22, using {$eq: 22}.

Fig 5.2.6: Retrieving documents where 'age' is not equal to 23, using {$ne: 23}.

Fig 5.2.7: Finding documents where 'score' is not equal to 75, using {$ne: 75}.

Fig 5.2.8: Querying for documents where 'age' is between 21 and 25 (inclusive), using {$gte: 21, $lte: 25}.

Fig 5.2.9: Finding documents where 'department' is not 'ECE', using {$ne: 'ECE'}.
3. Update (Modify Existing Documents)
Compass offers several ways to update documents:
3.1. In-Place Editing
For minor changes to a single document, you can edit it directly in the document view.
- Locate the document you wish to update.
- Click the pencil icon (
✏️) next to the document or hover over a field and click to edit. - Make your changes directly in the JSON editor or field.
- Click the green checkmark (
✔️) to save changes.

Fig 5.3: Directly editing a document in the Compass interface.
3.2. Updating Multiple Documents with Query
For more complex updates or to update multiple documents matching a criteria, use the "Update" button in the query bar.
- Apply a filter in the query bar to select the documents you want to update.
- Click the
Updatebutton. - In the update dialog, specify the update operation (e.g.,
{ "$set": { "status": "inactive" } }). - Choose whether to update a single document or multiple documents.
- Click
Updateto apply changes.
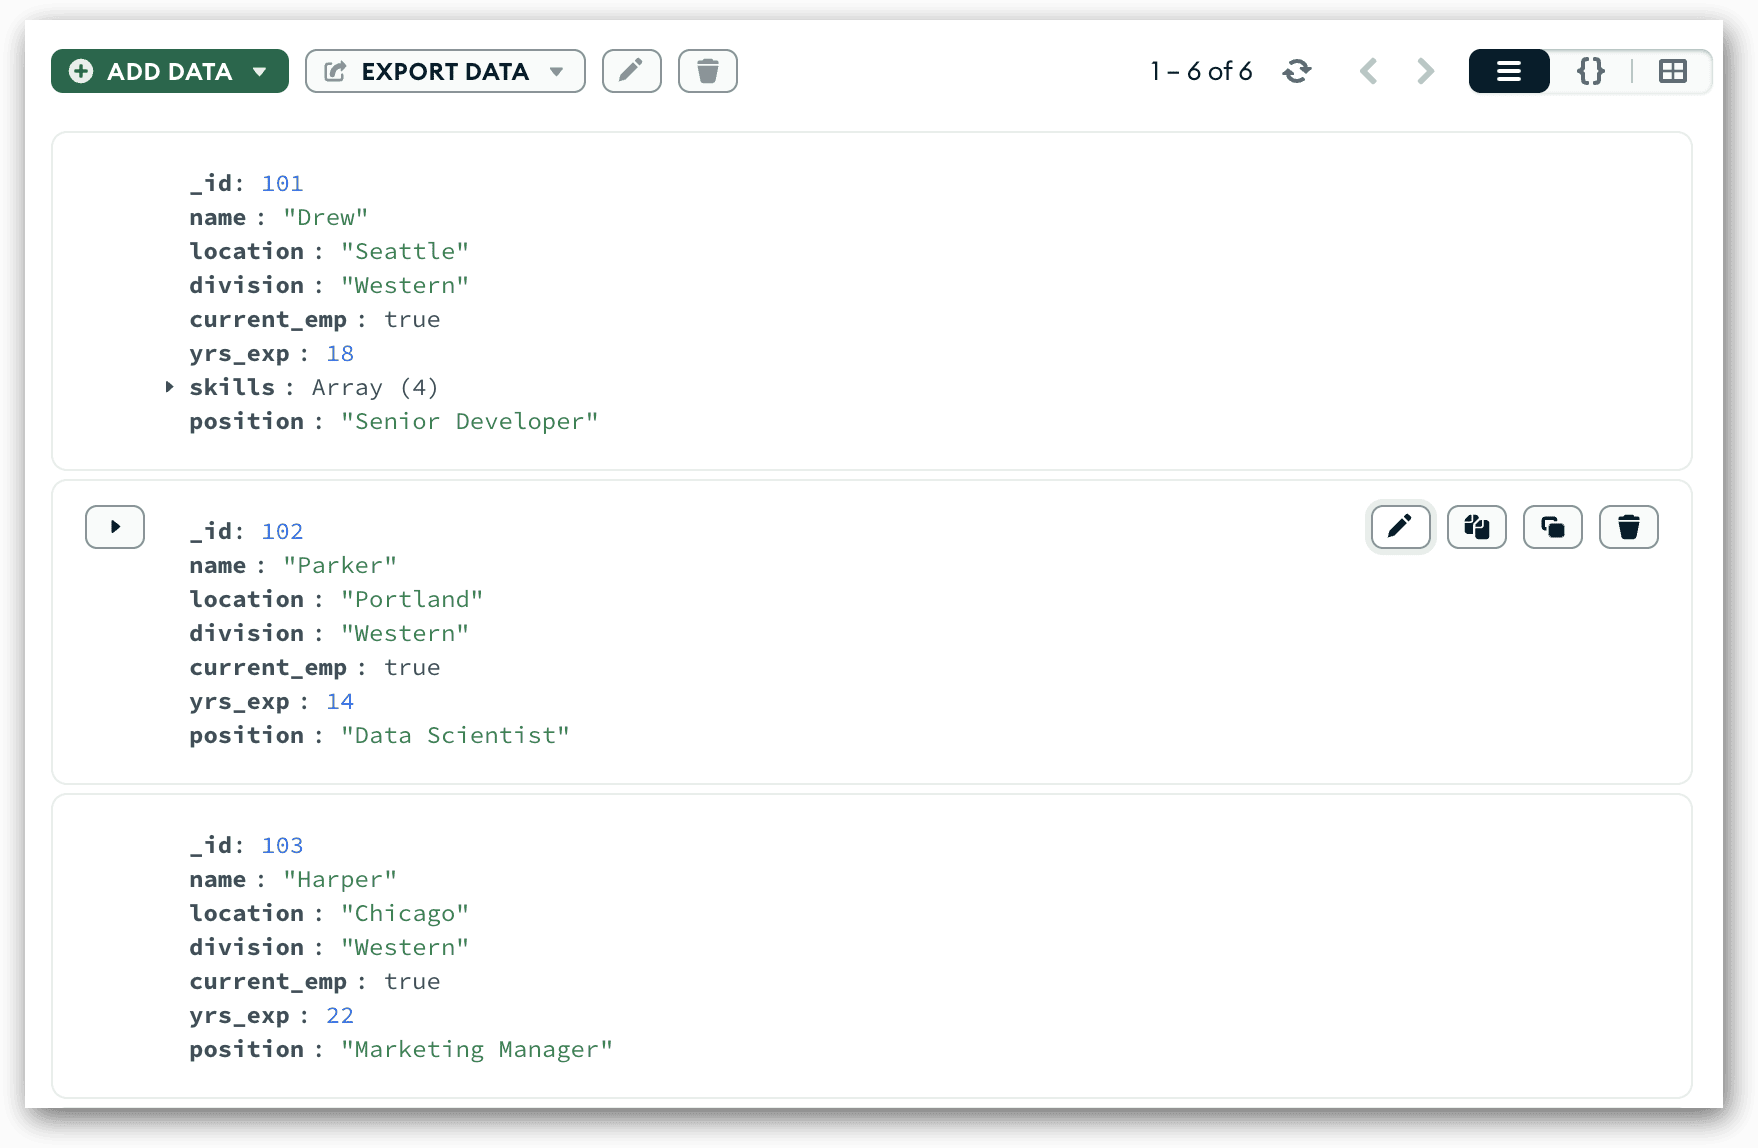
Fig 5.4: Using the update dialog to modify multiple documents based on a query.
4. Delete (Remove Documents)
Deleting documents can be done individually or in bulk based on a query.
4.1. Deleting a Single Document
- Locate the document you wish to delete.
- Click the trash can icon (
🗑️) next to the document. - Confirm the deletion in the pop-up dialog.
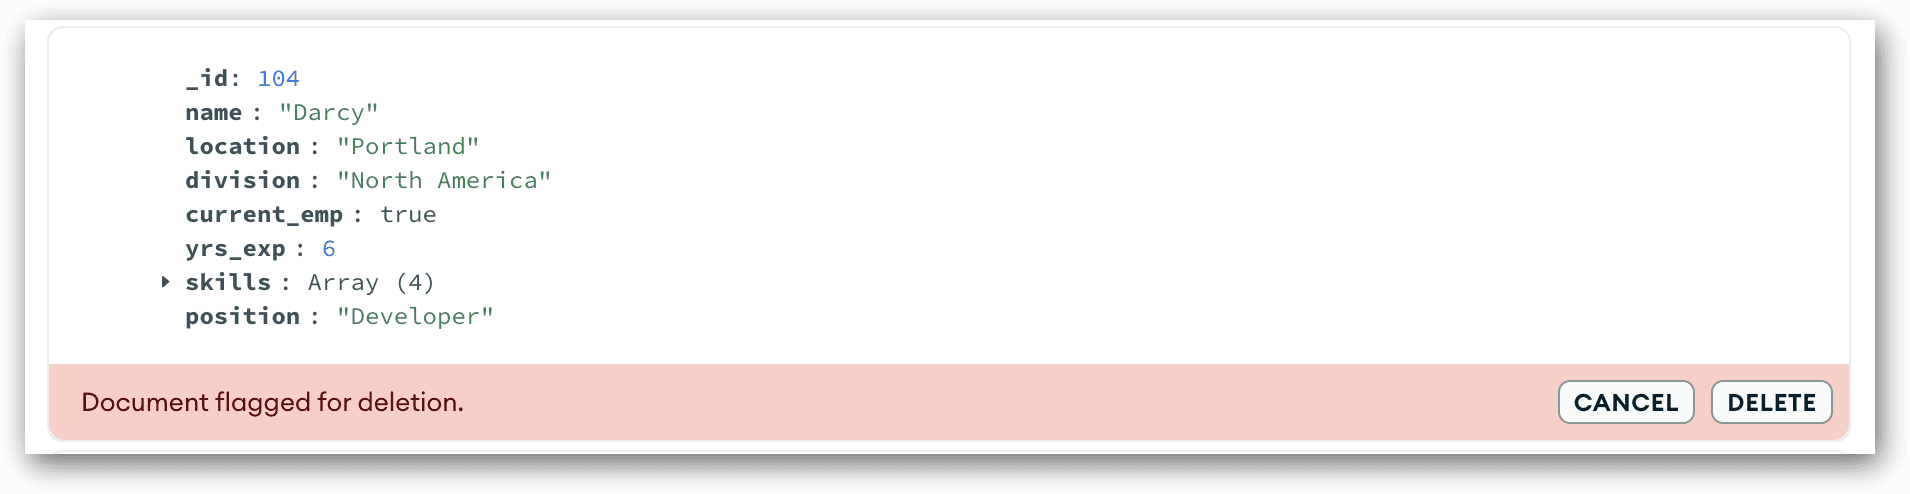
Fig 5.5: Deleting a single document with a confirmation prompt.
4.2. Deleting Multiple Documents with Query
To remove multiple documents that match specific criteria:
- Apply a filter in the query bar to select the documents you want to delete.
- Click the
Deletebutton. - Confirm the deletion in the dialog, which will show how many documents will be affected.
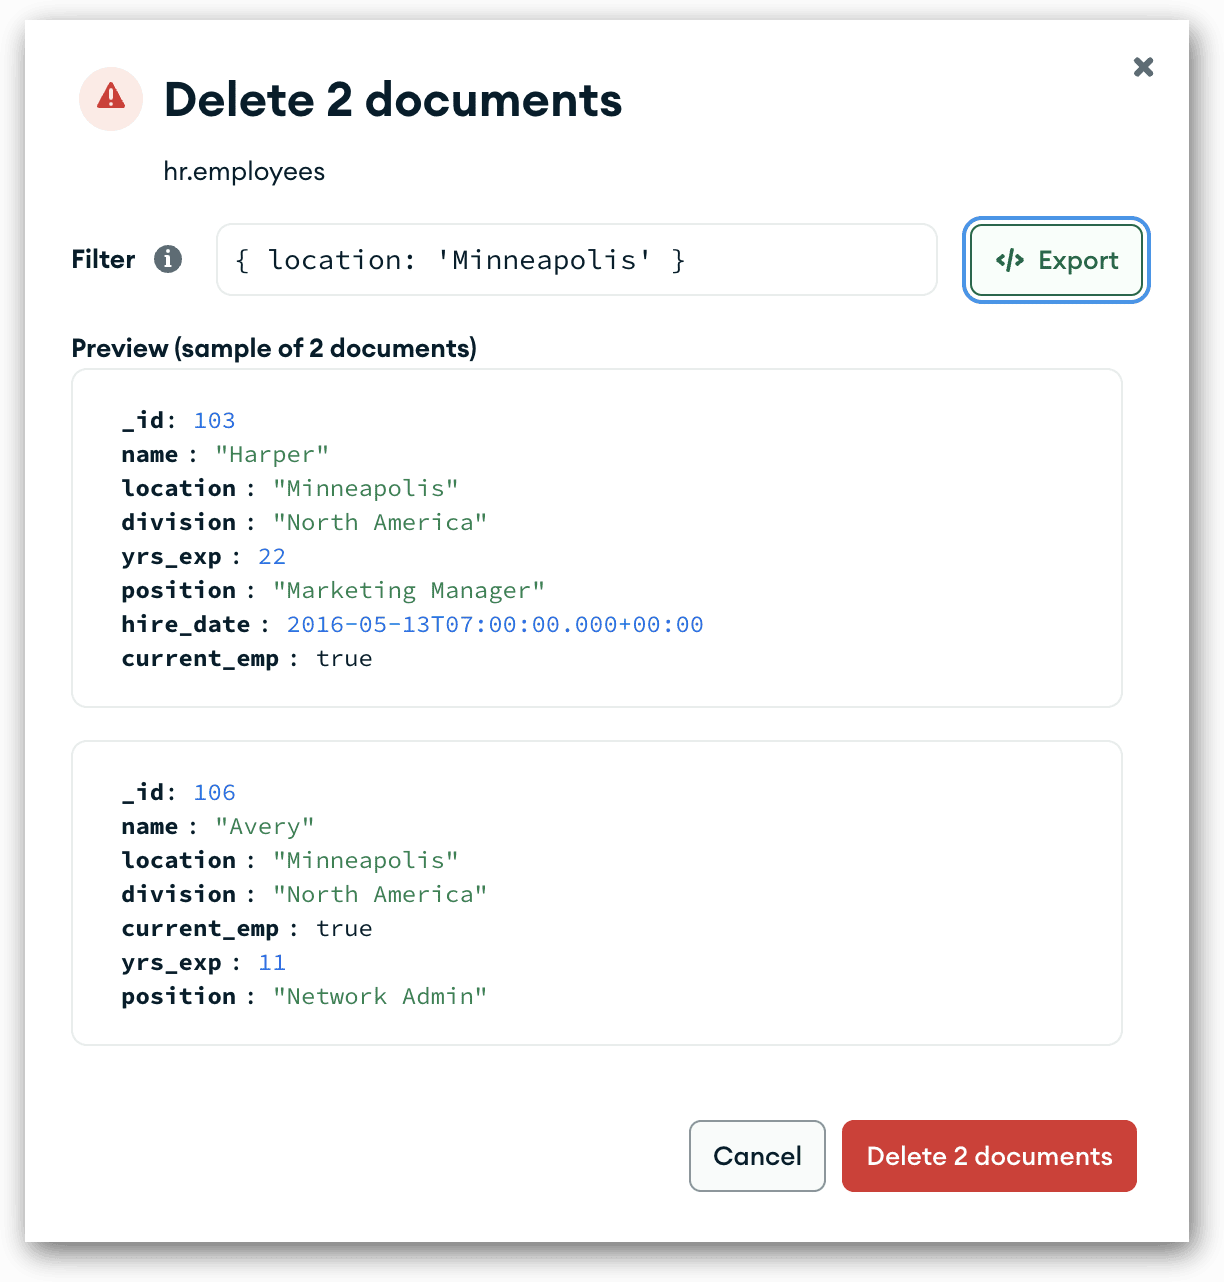
Fig 5.6: Deleting multiple documents based on a query filter.
Compass provides a safe and visual way to perform all essential CRUD operations, making database management more accessible and less error-prone.
📦 Schema Design and Performance Optimization with Compass
MongoDB's flexible schema is a powerful feature, but understanding its implications for design and performance is crucial. MongoDB Compass provides tools to help you visualize your schema and optimize your database's speed.
1. Understanding MongoDB's Flexible Schema
Unlike traditional relational databases, MongoDB is schema-less, meaning documents in a collection don't need to have the same fields or data types. This flexibility allows for rapid iteration and adaptation to changing data requirements.
- Embedded Documents: Store related data within a single document (e.g., an order document containing an array of line items). This is ideal for one-to-one or one-to-few relationships, enabling faster reads with fewer queries.
- Referenced Documents: Store related data in separate collections and link them using references (e.g., storing user profiles and their posts in separate collections, linked by user IDs). This is suitable for one-to-many or many-to-many relationships, providing more modularity and reducing data duplication.
Compass's Schema tab helps you visualize the actual structure of your documents, showing you how fields are distributed and what data types they hold, which is invaluable for making informed schema design decisions.
2. Indexing for Performance
Indexes are special data structures that store a small portion of the collection's data in an easy-to-traverse form. They significantly improve the speed of query operations by allowing MongoDB to find documents without scanning the entire collection.
2.1. Importance of Indexes
- Faster Reads: Queries that use indexes can execute much quicker.
- Efficient Sorting: Indexes can help sort results without needing to perform an in-memory sort.
- Unique Constraints: Indexes can enforce uniqueness on field values.
2.2. Creating Indexes with Compass
Compass provides a user-friendly interface to create and manage indexes:
- Go to the "Indexes" tab of your collection.
- Click
Create Index. - Specify the field(s) for the index and the sort order (ascending/descending).
- Configure options like uniqueness, sparse, or TTL (Time-To-Live) indexes.
- Click
Create.
3. Analyzing Query Performance with Explain Plan
The "Explain Plan" feature in Compass is a powerful tool to understand how MongoDB executes your queries. It provides detailed information about the query execution process, including:
- Index Usage: Whether your query used an index and which one.
- Scan Type: If it performed a collection scan (slow) or an index scan (fast).
- Execution Time: How long each stage of the query took.
- Documents Examined/Returned: The number of documents MongoDB had to look at versus the number it returned.
To use it, enter your query in the query bar, then click the Explain Plan button. Compass visualizes the plan, making it easy to spot inefficiencies and identify where new indexes might be beneficial.
By leveraging Compass's schema visualization and performance tools, you can design more efficient schemas and ensure your MongoDB queries run optimally.
📈 Future Scope and Evolution of MongoDB Compass
MongoDB Compass is continuously evolving, with new features and improvements being rolled out regularly. The future of Compass is likely to focus on deeper integrations, more intelligent assistance, and enhanced collaboration capabilities to meet the growing demands of modern data management.
1. Deeper Integration with MongoDB Atlas
As MongoDB Atlas becomes the preferred way to deploy MongoDB in the cloud, Compass will likely offer even more seamless integration. This could include:
- Serverless Instance Management: Direct management and monitoring of serverless MongoDB instances.
- Data Lake Integration: Enhanced capabilities to query and visualize data stored in MongoDB Data Lake.
- Cloud-Specific Features: Tools tailored for Atlas-specific features like data federation, multi-cloud deployments, and cross-region replication.
Fig 7.1: Closer integration between Compass and MongoDB Atlas cloud services.
2. AI-Powered Query Suggestions and Optimization
Leveraging artificial intelligence and machine learning, future versions of Compass could offer:
- Intelligent Query Suggestions: Proposing optimal query filters or aggregation stages based on your data patterns and common use cases.
- Automated Index Recommendations: Analyzing your query history and data access patterns to suggest new indexes that would significantly improve performance.
- Schema Anomaly Detection: More advanced AI-driven detection of unusual data patterns or schema inconsistencies that might indicate data quality issues.
3. Enhanced Team Collaboration Features
For teams working on shared databases, collaboration features are becoming increasingly important:
- Shared Queries and Aggregations: Ability to save, share, and version control queries and aggregation pipelines within a team.
- Role-Based Access Control (RBAC) Integration: Tighter integration with MongoDB's RBAC for managing user permissions directly within Compass.
- Real-time Collaboration: Potentially allowing multiple users to view or even co-edit queries and pipelines in real-time.
4. Advanced Dashboards and Analytics
While Compass already offers some visualization, future enhancements could include:
- Customizable Dashboards: Building interactive dashboards directly within Compass to monitor key metrics and data trends.
- Integration with BI Tools: More seamless connections with popular Business Intelligence (BI) tools for deeper analytical insights.
- Predictive Analytics: Basic predictive modeling capabilities to forecast data trends or identify potential issues.
The continuous development of MongoDB Compass promises an even more powerful, intelligent, and user-friendly experience for managing and interacting with your MongoDB databases in the years to come.


I got most knowledge about MongoDB is very helpful for me thanku
ReplyDeleteGrate information about MongoDB very knowledgeable content it helps me alot thanku
ReplyDeleteGreat post
ReplyDeleteVery nice aditya 👍🏻
ReplyDeleteMongoDB for a blog website — helpful if you're seeding a database or testing a comments section. Below are some realistic example blog comments in JSON format, suitable for MongoDB.
ReplyDeleteExcellent Aditya
ReplyDeleteNice topic and great presentation
ReplyDeleteThis blog really helpfull got very detail about mongodb
ReplyDelete👏👏👏
ReplyDeleteBestt ♥️
ReplyDeleteNice 👍🏼
ReplyDeleteGreat guide! This post really helped me understand MongoDB better, especially the parts about indexing and sharding. Thanks for breaking it down so clearly. Looking forward to more tutorials like this!
ReplyDeleteWonderful 👍
ReplyDeleteExcellent presentation! Clear, well-structured.
ReplyDeleteVery nice
ReplyDelete✨👌🎉
ReplyDeleteThe presentation is really eye-catching and useful ! Excellent work child
ReplyDeleteNice Design and Neatly Managed Data - Hire me if you need a Graphic Designer 😂
ReplyDelete👏
ReplyDeleteVERY INTRESTING ♥️
ReplyDeleteVery informative, amazing work bro ✨
ReplyDeleteVeryyyy Goooood 🩷🩷🩷
ReplyDelete